Showing posts with label PowerPoint. Show all posts

Wednesday, 17 August 2016

How to Save or Convert PowerPoint Presentation into a Video


At times after creating our PowerPoint presentation, we want to share it with our client as video but we do not know how to do that. But you can do it yourself. Yes, it's possible and that too without using other applications. It creates .wmv file format video. If you want other video formats (.avi, .mov, .mp4, etc), use third party applications available FREE on internet.

First, create a nice presentation in PowerPoint - complete in all means. You can use slide transition, animations on slides and even use embedded video. For video conversion, follow the below steps:

turn powerpoint slides into video

  1. Go to File menu, click Save As (If you want quick video without any change in default setting).
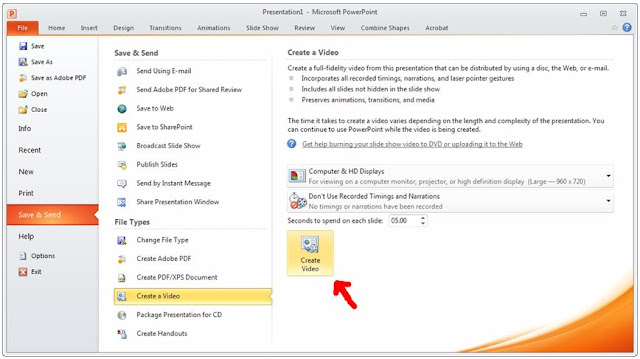
  2. If you want to change video settings like dimension, quality and other things - Go to File menu, click Save & Send, click Create a video.
  3. For video quality and size options under Create a video, click the Computer & HD Displays down arrow.
  4. Select one of the following:
    • To create a very high quality video (remember large file size), click Computer & HD Displays.
    • To create a moderate file size and medium quality video, click Internet & DVD.
    • To create a small file size and low quality video, click Portable Devices.
  5. Under Don't Use Recorded Timings and Narrations down arrow, select one of the following:
    • If you haven't recorded time and voice narration while creating the presentation or you have recorded but you do not want to use in the video, click Don't Use Recorded Timings and Narration. The default time for each slide is set to 5 seconds. You can change if you want by clicking the up arrow to increase the seconds, or the down arrow to decrease the seconds.
    • If you recorded timed and voice narration and want to use in the video, click Use Recorded Timings and Narrations.
  6. Now click Create Video.
  7. In the File name box, enter a suitable file name for the video, browse and set the destination folder for saving, then click Save. You can see the progress of the video creation at the status bar at the bottom of your PowerPoint screen. The video creation process may take up to hours depending on the length of the video and the complexity of your presentation. Be patient. :)
  8. Once video creation is complete, go to the designated folder, and double-click the file to see the video. You are done!
Friday, 5 August 2016

How to Insert Outlook Email in PowerPoint

While working in professional environment, we occasionally need to insert relevant email communication into our PowerPoint presentation for reference. To insert or embed Outlook email:
  1. Open an email 
  2. Go to File > Save As
  3. Choose Save file type as "Outlook Message Format" or "Outlook Message Format - Unicode"
  4. Save the email 
  5. Now go to the location where you saved the email file
  6. Copy the saved email file by pressing Ctrl + C
  7. Go to the PPT slide and paste the file by pressing Ctrl + V
  8. An envelop icons will be pasted on the PPT slide with email file name
Remember, it doesn't work in Presentation mode of the PPT. To read the email double-click the email icon pasted on the slide in Normal mode.

Thursday, 4 August 2016

How to Lock Background Image in PowerPoint

At times we work on a slide that has lots of content, graphics, objects/shapes on top of a background. We face challenge while working on complex slides presentation. When we move slide objects, slide background also moves. Therefore, better to fix or lock the image background and then work. There are two ways of doing it. Try either way according to your requirements.
  

Option 1:

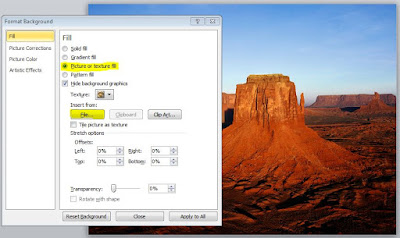
Right click on the slide > Select “Format Background” > Select radio button “Picture or texture fill”. Insert your image by clicking “File” and then select your image for background. (See below image for reference)


Remember, you can’t scale image after inserting. So, better crop the image manually according to the slide requirement and then insert in PPT. You can also give transparency on the image.

Option 2:

You can use second way by keeping the image background on slide’s master layout. Shortcut for going directly into that particular slide master is – Press Shift and click Normal view icon at bottom right corner of your PPT window. (See below image for reference).


Just cut the image from the slide and go into its master slide and paste there. But it will reflect on all the slides where same master layout is being used. If you do not want the show on other slides, just duplicate that master layout and use that layout exclusively for that particular slide where you want to keep the background locked.